介绍CoreText的一些概念
Core Text基础
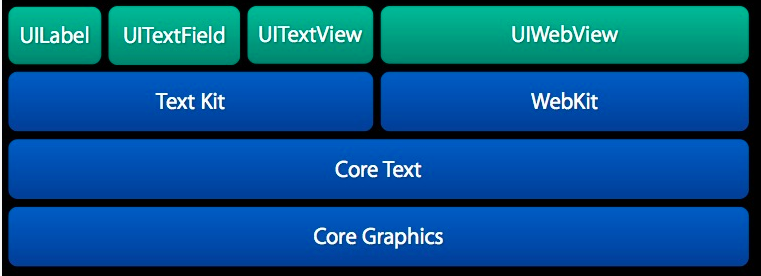
CoreText 是用于处理文字和字体的底层技术。它直接和 Core Graphics(又被称为 Quartz)打交道。
UIWebView 也是处理复杂的文字排版的备选方案。对于排版,基于 CoreText 和基于 UIWebView 相比,前者有以下好处:
CoreText 占用的内存更少,渲染速度快,UIWebView 占用的内存更多,渲染速度慢。
CoreText 在渲染界面前就可以精确地获得显示内容的高度(只要有了 CTFrame 即可),而 UIWebView 只有渲染出内容后,才能获得内容的高度(而且还需要用 javascript 代码来获取)
CoreText 的 CTFrame 可以在后台线程渲染,UIWebView 的内容只能在主线程(UI 线程)渲染。
基于 CoreText 可以做更好的原生交互效果,交互效果可以更细腻。而 UIWebView 的交互效果都是用 javascript 来实现的,在交互效果上会有一些卡顿存在。例如,在 UIWebView 下,一个简单的按钮按下效果,都无法做到原生按钮的即时和细腻的按下效果。
当然,基于 CoreText 的排版方案也有一些劣势:
CoreText 渲染出来的内容不能像 UIWebView 那样方便地支持内容的复制。
基于 CoreText 来排版需要自己处理很多复杂逻辑,例如需要自己处理图片与文字混排相关的逻辑,也需要自己实现链接点击操作的支持。
以下是Core Text的构成:
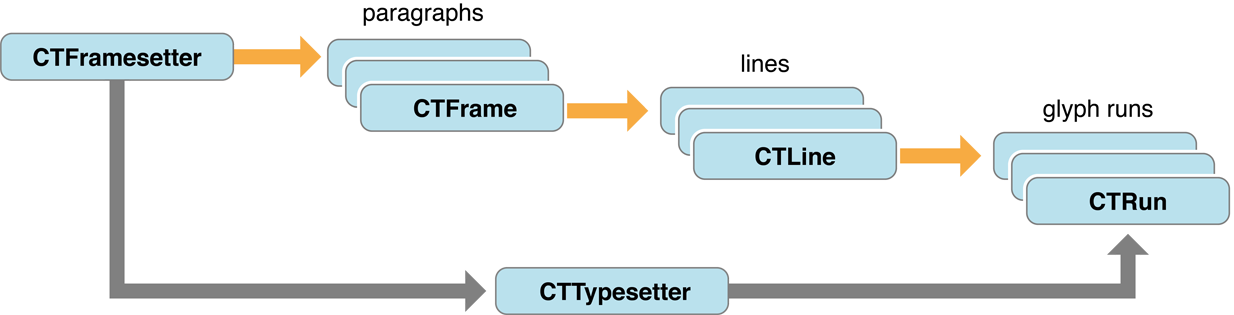
- CTFrame可以想象成画布, 画布的大小范围由CGPath决定
- CTFrame由很多CTLine组成, CTLine表示为一行
- CTLine由多个CTRun组成, CTRun相当于一行中的多个块, 但是CTRun不需要你自己创建, 由NSAttributedString的属性决定, 系统自动生成。每个CTRun对应不同属性
- CTFramesetter是一个工厂, 创建CTFrame, 一个界面上可以有多个CTFrame
字体

- 字体(Font):是一系列字号、样式和磅值相同的字符(例如:10磅黑体Palatino)。现多被视为字样的同义词
- 字面(Face):是所有字号的磅值和格式的综合
- 字体集(Font family):是一组相关字体(例如:Franklin family包括Franklin Gothic、Fran-klinHeavy和Franklin Compressed)
- 磅值(Weight):用于描述字体粗度。典型的磅值,从最粗到最细,有极细、细、book、中等、半粗、粗、较粗、极粗
- 样式(Style):字形有三种形式:Roman type是直体;oblique type是斜体;utakuc type是斜体兼曲线(比Roman type更像书法体)。
- x高度(X height):指小写字母的平均高度(以x为基准)。磅值相同的两字母,x高度越大的字母看起来比x高度小的字母要大
- Cap高度(Cap height):与x高度相似。指大写字母的平均高度(以C为基准)
- 下行字母(Descender):例如在字母q中,基线以下的字母部分叫下伸部分
- 上行字母(Ascender):x高度以上的部分(比如字母b)叫做上伸部分
- 基线(Baseline):通常在x、v、b、m下的那条线 描边(Stroke):组成字符的线或曲线。可以加粗或改变字符形状
CoreText定义的字体 样式
可以在 CTStringAttributes.h 中找到
1 | const CFStringRef kCTCharacterShapeAttributeName; |
CoreText坐标系
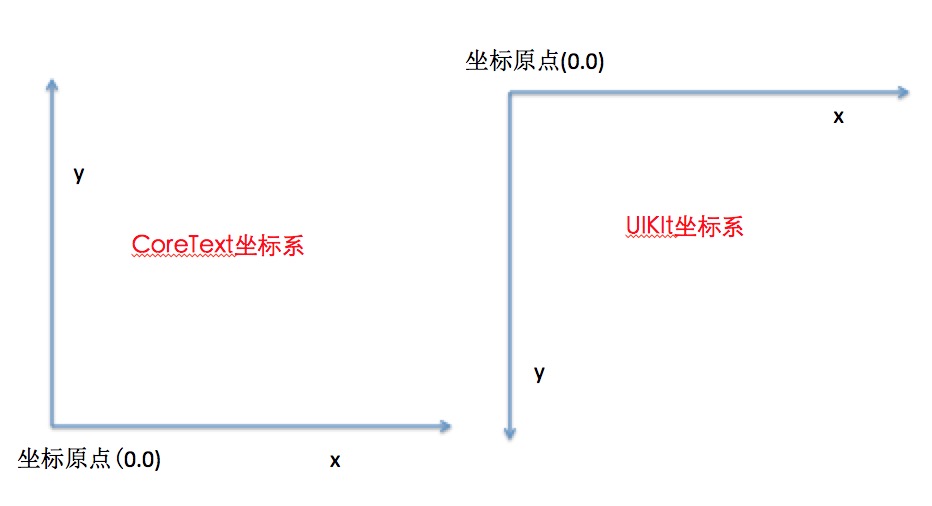
从图中可看出CoreText坐标系是以左下角为坐标原点,而我们常使用的UIKit是以左上角为坐标原点,因此在CoreText中的布局完成后需要对其坐标系进行转换,否则直接绘制出现位置反转的镜像情况。
CoreText 图文混排
CoreText实际上并没有相应API直接将一个图片转换为CTRun并进行绘制,它所能做的只是为图片预留相应的空白区域,而真正的绘制则是交由CoreGraphics完成。(像OSX就方便很多,直接将图片打包进NSTextAttachment即可,根本无须操心绘制的事情,所以基于这个想法,M80AttributedLabel的接口和实现也是使用了attachment这么个概念,图片或者UIView都是被当作文字段中的attachment。)
在CoreText中提供了CTRunDelegate这么个Core Foundation类,顾名思义它可以对CTRun进行拓展:AttributedString某个段设置kCTRunDelegateAttributeName属性之后,CoreText使用它生成CTRun是通过当前Delegate的回调来获取自己的ascent,descent和width,而不是根据字体信息。这样就给我们留下了可操作的空间:用一个空白字符作为图片的占位符,设好Delegate,占好位置,然后用CoreGraphics进行图片的绘制。
基本使用步骤
新建一个UIView类,在其drawRect方法中
1 | -(void)drawRect:(CGRect)rect{ |
Hello CoreText就会显示在该View上了,这是CoreText的基本使用步骤。
简单的富文本
在上面代码的基础上,为NSAttributeString添加相关的字体信息
1 | NSMutableAttributedString* mAttStr = [[NSMutableAttributedString alloc]initWithString:@"Hello CoreText ;Hello CoreText ;Hello CoreText ;Hello CoreText ;Hello CoreText ;Hello CoreText ;Hello CoreText ;Hello CoreText ;Hello CoreText ;Hello CoreText ;Hello CoreText ;Hello CoreText ;Hello CoreText ;Hello CoreText ;Hello CoreText ;Hello CoreText ;"]; |
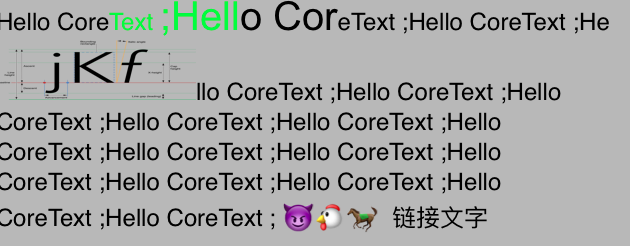
效果图: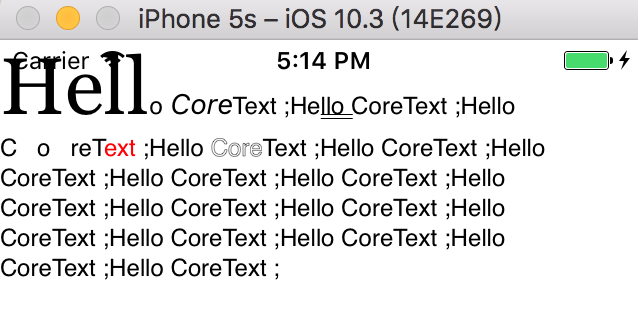
更多的样式
在介绍如何绘制更多样式之前,需要介绍 按Line绘制
CTLineDraw和按Run绘制CTRunDraw
CTLineDraw 按行绘制
将上面的
1 | CTFrameDraw(frame, context); |
替换成:
1 | //7.2使用CTLine绘制 |
CTRunDraw 按Run绘制
将上面的
1 | CTFrameDraw(frame, context); |
替换成:
1 | //7.3 使用CTRun绘制 |
最终 CTRunDraw CTLineDraw 和 CTFrameDraw的绘制结果都是相同的。
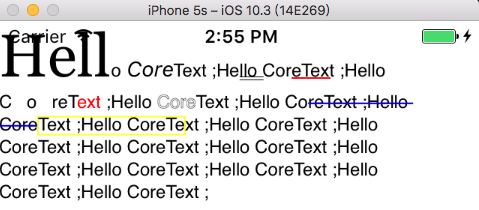
实现删除线效果
既然我们可以按照一小块CTRun的方式绘制,就可以对一些CTRun做一些自定义绘制
比如在 < CoreText/CTStringArrtibutes.h >中并没有找到删除线的定义,我们可以尝试去实现它。
**一、**在NSAttributedString中添加删除线属性(NSStrikethroughStyleAttributeName字段定义在NSAttributedString.h中,coreText没有对应的实现)
1 | //额外的删除线 |
**二、**在上面按run绘制的基础上判断一下有无删除线属性,有就绘制。
1 | //7.3 使用CTRun绘制 |
三、 实现方法 -drawStrikethroughStyleInRun: attributes : context :
1 | /** |
实现效果:

实现自定义样式-矩形框标注
自定义一个TSRectColor 一个包住文字的矩形框,尝试去实现它。
一、 在 NSAttributedString 中添加自定义属性:
1 | //自定义的矩形框 |
二、 修改一下上面的实现删除线的代码,添加实现矩形框。与实现删除线不一样的是,实现矩形框需要在CTRunDraw之前:
1 | //7.3 使用CTRun绘制 |
三、 实现 -drawRectColorInRun: attributes: context:
1 | /** |
实现效果:
添加超链接
如何识别文字中的超链接 不同场景有不同的处理方式,这里就不处理了。
添加超链接 简单来讲就是重写touchesBegan方法 获取点击的点,再到
CTFrameRef中比较
重写touchesBegan方法 根据touch事件获取点point
1 | -(void)touchesBegan:(NSSet<UITouch *> *)touches withEvent:(UIEvent *)event{ |
判断touch点
1 | -(bool)ifClickLink:(CGPoint)point{ |
这样就监测到了点击事件,并且知道点击了哪个字符。再做相关超链接的点击逻辑,就添加超链接功能成功了。
以上代码都在 https://github.com/sunyanyan/TSCode/blob/master/CoreText/CoreText/TestView.m
图文混排
CoreText是不直接支持绘制图片的,但是我们可以先在需要显示图片的地方用一个特殊的空白占位符代替,同时设置该字体的CTRunDelegate信息为要显示的图片的宽度和高度,这样绘制文字的时候就会先把图片的位置留出来,再在drawRect方法里面用CGContextDrawImage绘制图片。
在NSMutableString中添加空白字符为图片占位
1 | -(void)addImageAttStr{ |
其中用到的CTRun delegate回调
1 | static CGFloat ascentCallback(void *ref) { |
然后在CTFrameDraw之后用CGContextDrawImage绘制图片
1 | //8. 绘制图片 |
用到的calculateImagePositionInCTFrame方法:
1 | - (CGRect)calculateImagePositionInCTFrame:(CTFrameRef)ctFrame { |
如图: