scrapy基础实例,爬取zhipin网站信息
scarpy的新建 + scarpy模拟登录 + 在pipeline中存取信息到sqlite3 +xpath解析页面
文档
环境 python3.5.2 + scrapy1.3
scrapy新建工程 1 scrapy startproject projectName
具体可以查看 python3爬虫学习
发现 parse 或者 start_requests 是爬虫的入口
解析html scrapy支持xpath 和 css 两种选择器。这里使用xpath。
比如 这个页面 我们要获取页面上帖子的链接:
1
2
3
4
5
6
7
8
9
10
... def parse_page (self, response ): print ("\n 开始 解析版面上的具体招聘帖子的链接\n" ) selector = scrapy.Selector(response) job_list = selector.xpath("//div[@class='job-list']/ul[1]/li/a" ) for job_list_content in job_list: url = self .host + job_list_content.xpath("@href" ).extract_first() print ("\n帖子 链接是: " +url+"\n" )
这样就或获取到帖子的链接
递归 如何解析帖子链接的内容,并且递归到下一页呢?这里需要使用yield:
1 yield scrapy.Request(url=url, callback=self .parse_page)
scrapy会自行调度,并访问该url然后把内容拿回来
具体代码:
1
2
3
4
5
6
7
8
9
10
11
12
13
14
15
16
17
18
19
20
21
22
23
24
25
26
27
28
29
30
31
32
33
34
35
36
37
38
39
40
41
42
43
44
45
class TestZhiPinSpider2 (scrapy.Spider): name = "TestZhiPinSpider2" host = "https://www.zhipin.com" start_urls = [ "https://www.zhipin.com/job_detail/?query=iOS&scity=101210100" ] def start_requests (self ): print (" 开始解析url ----------------------------------------------------------------------------------------" ) for url in self .start_urls: yield scrapy.Request(url=url, callback=self .parse_page) def parse_page (self, response ): print ("解析 parse_page ----------------------------------------------------------------------------------------" ) selector = scrapy.Selector(response) job_list = selector.xpath("//div[@class='job-list']/ul[1]/li/a" ) for job_list_content in job_list: url = self .host + job_list_content.xpath("@href" ).extract_first() print ("帖子 链接是: " +url) yield scrapy.Request(url=url, callback=self .parse_job_detail) next_page_url = selector.xpath("//a[@ka='page-next']" ).xpath("@href" ).extract_first() next_page_class = selector.xpath("//a[@ka='page-next']" ).xpath("@class" ).extract_first() if next_page_class == "next" : next_page_full_url = self .host + next_page_url yield scrapy.Request(url=next_page_full_url, callback=self .parse_page) else : print ("没有下一页了----------------------------------------------------------------------------" ) def parse_job_detail (self, response ): selector = scrapy.Selector(response) job_url = response.request.url print (" 解析 具体的招聘信息 --------url:" +job_url)
这个爬虫会将zhipin网站iOS招聘的信息都爬取一遍
Pipelines 可以看到新建工程后会生成一个pipelines.py的文件,可以在这里处理抓取的内容,存入数据库什么的。
1.在items.py中定义抓取的内容 这里简单写一个
1
2
class TestJobDetailItem (Item ): url = Field()
2.在pipelines中处理 在pipelines.py中新建Sqlite3Pipeline方法,原来可能有个FilePipeline不理它。
1
2
3
4
5
6
7
8
9
10
11
12
13
14
15
16
17
18
19
20
21
22
23
24
25
26
27
28
29
30
31
32
33
34
35
36
37
38
39
40
41
42
43
44
45
46
47
48
49
50
51
52
53
54
55
56
57
58
59
60
from jobSpider.items import JobDetailItemfrom jobSpider.items import TestJobDetailItemimport sqlite3import osimport shutilfrom collections import OrderedDictclass Sqlite3Pipeline (object ): def __init__ (self, sqlite_file, sqlite_base_file, sqlite_ZhiPin_table, sqlite_Test_ZhiPin_table ): self .sqlite_file = sqlite_file self .sqlite_base_file = sqlite_base_file self .sqlite_ZhiPin_table = sqlite_ZhiPin_table self .sqlite_Test_ZhiPin_table = sqlite_Test_ZhiPin_table @classmethod def from_crawler (cls, crawler ): return cls( sqlite_file = crawler.settings.get('SQLITE_FILE_PATH' ), sqlite_base_file=crawler.settings.get('SQLITE_BASE_FILE_PATH' ), sqlite_ZhiPin_table = crawler.settings.get('SQLITE_ZHI_PIN_ITEM_TABLE' ), sqlite_Test_ZhiPin_table=crawler.settings.get('SQLITE_TEST_ZHI_PIN_ITEM_TABLE' ) ) def open_spider (self, spider ): print ("\n 连接数据库 \n" ) self .create_sql_db() self .conn = sqlite3.connect(self .sqlite_file) self .cur = self .conn.cursor() def close_spider (self, spider ): print ("\n 关闭数据库 \n" ) self .conn.close() def process_item (self, item, spider ): print ("\n Sqlite3Pipeline process_item\n" ) if isinstance (item, TestJobDetailItem): print (" sqlite3 处理 TestJobDetailItem " ) orderedDict = OrderedDict(sorted (item.items(), key=lambda t: t[0 ])) keys = list (orderedDict.keys()) values = list (orderedDict.values()) insert_sql = "insert into {0}({1}) values ({2})" .format (self .sqlite_ZhiPin_table, ', ' .join(keys), ', ' .join(['?' ] * len (keys))) self .cur.execute(insert_sql, values) self .conn.commit() return item else : print (" item 类型不对 sqlite3不处理" ) return item def create_sql_db (self ): sql_db_path = os.path.abspath(self .sqlite_file) sql_base_db_path = os.path.abspath(self .sqlite_base_file) print ("\n create_sql_db \n " , sql_db_path, sql_base_db_path) if not os.path.exists(sql_db_path): shutil.copyfile(sql_base_db_path, sql_db_path)
这里例子详细写了将抓取数据写入数据库,这里用的是sqlite3。可以换成文件csv,mysql什么的。
3.在Setting中配置一下 找到settings.py 写入:
1 2 3 4 5 SQLITE_FILE_PATH = '/Users/sts/Desktop/github/pythonWorkSapce/jobSpider/jobSpider/sqlite/Item_use.sqlite' SQLITE_BASE_FILE_PATH = '/Users/sts/Desktop/github/pythonWorkSapce/jobSpider/jobSpider/sqlite/Item_base.sqlite' SQLITE_ZHI_PIN_ITEM_TABLE = 'ZhiPinJobDetail' SQLITE_TEST_ZHI_PIN_ITEM_TABLE = 'TestZhiPin'
和
1 2 3 4 ITEM_PIPELINES = { 'jobSpider.pipelines.Sqlite3Pipeline' : 400 , }
这里可以配置多个pipeline,后面的数字表示优先级。scrapy会根据优先级,把item依次交给各个pipeline来处理。
4.在爬虫中调用这个pipeline 在上面递归例子中,加入 yield item
1
2
3
4
5
6
7
8
9
10
11
12
13
from jobSpider.items import JobDetailItem... def parse_job_detail (self, response ): selector = scrapy.Selector(response) job_url = response.request.url print (" 解析 具体的招聘信息 --------url:" +job_url) item = TestJobDetailItem() item["url" ] = job_url yield item
scrapy会把这个item交给我们刚刚写的FilePipeline来处理.
登录
很多爬虫信息都要登录后才能抓取,这里也将登录模拟一遍,还是用 zhipin 网站。
1 2 3 4 5 6 7 8 9 10 11 12 13 14 15 16 17 18 19 20 21 22 23 24 25 26 27 28 29 30 31 32 33 34 35 36 37 38 39 40 41 42 43 44 45 46 47 48 login_url = "https://www.zhipin.com/user/login.html?ka=header-login" login_post_url = "https://www.zhipin.com/login/account.json" host = "https://www.zhipin.com" def start_requests (self ): yield scrapy.Request(url=self .login_url, meta={'cookiejar' : 1 }, callback=self .request_captcha) def request_captcha (self, response ): selector = scrapy.Selector(response) captcha_url = selector.xpath("//img[@class='verifyimg']" ).xpath("./@src" ).extract_first() randomKey = selector.xpath("//input[@class='randomkey']" ).xpath("./@value" ).extract_first() full_captcha_url = self .host + captcha_url fileName = self .captcha_file_path() urlretrieve(full_captcha_url, fileName) open_image_command = "open " +fileName os.system(open_image_command) captcha_str = input ("请输入验证码:" ) return scrapy.FormRequest.from_response( response, formdata={"regionCode" : "+86" , "account" : "手机号" , "password" : "密码" , "captcha" : captcha_str, "randomKey" : randomKey}, meta={'cookiejar' : response.meta['cookiejar' ]}, callback=self .after_login ) def after_login (self, response ): print ("after_login" ) yield scrapy.Request(url=self .host, meta={'cookiejar' : response.meta['cookiejar' ]}, callback=self .open_host_page) def captcha_file_path (self ): captcha_file_name = "./image/captcha.jpg" directory = os.path.dirname(captcha_file_name) if not os.path.exists(directory): os.makedirs(directory) return captcha_file_name
setting的一些配置 1 2 3 4 5 6 7 8 9 10 11 12 13 14 DOWNLOAD_DELAY = 5 CONCURRENT_REQUESTS_PER_DOMAIN = 16 CONCURRENT_REQUESTS_PER_IP = 16 DEFAULT_REQUEST_HEADERS = { 'Accept' : 'text/html,application/xhtml+xml,application/xml;q=0.9,image/webp,*/*;q=0.8' , 'Accept-Language' : 'zh-CN,zh;q=0.8,en;q=0.6' , 'Accept-Encoding' :'gzip, deflate, sdch, br' , 'Connection' : 'keep-alive' , 'User-Agent' :'Mozilla/5.0 (Macintosh; Intel Mac OS X 10_12_1) AppleWebKit/537.36 (KHTML, like Gecko) Chrome/57.0.2987.133 Safari/537.36' }
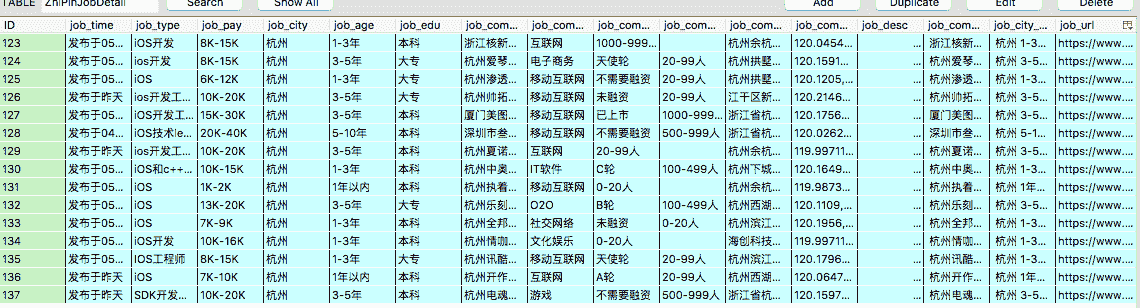
最后 就可以爬取到所需要的招聘信息了:
具体代码查看: https://github.com/sunyanyan/jobSpider