使用AV Foundation 捕捉照片和视频
使用AVFoundation拍照和录制视频的一般步骤如下:
- 创建AVCaptureSession对象。
- 使用AVCaptureDevice的静态方法获得需要使用的设备,例如拍照和录像就需要获得摄像头设备,录音就要获得麦克风设备。
- 利用输入设备AVCaptureDevice初始化AVCaptureDeviceInput对象。
- 初始化输出数据管理对象,如果要拍照就初始化AVCaptureStillImageOutput对象;如果拍摄视频就初始化AVCaptureMovieFileOutput对象。
- 将数据输入对象AVCaptureDeviceInput、数据输出对象AVCaptureOutput添加到媒体会话管理对象AVCaptureSession中。
- 创建视频预览图层AVCaptureVideoPreviewLayer并指定媒体会话,添加图层到显示容器中,调用AVCaptureSession的startRuning方法开始捕获。
- 将捕获的音频或视频数据输出到指定文件。
主要用到的类:
- AVCaptureDeviceInput (输入设备)
- AVCaptureDevice
- AVCaptureSession (捕捉会话)
- AVCaptureVideoPreviewLayer (展示层)
- AVCaptureOutput (输出)
- AVCaptureStillImageOutput (捕捉图片)
- AVCaptureAudioDataOutput
- AVCaptureVideoDataOutput
- AVCaptureFileOutput
配置会话:
简单配置会话
1 | //初始化会话 |
添加音频捕捉设备(麦克风)
输入不仅可以添加摄像头 ,页可以添加麦克风
1 | // Setup default microphone |
添加视频输出
输出不仅可以添加静态图片,可以添加视频输出
1 | // Setup movie file output |
启动或者停止会话
启动会话,使它处于图片和视频捕捉状态。最好不要在主线程中启动。
1 | - (void)startSession { |
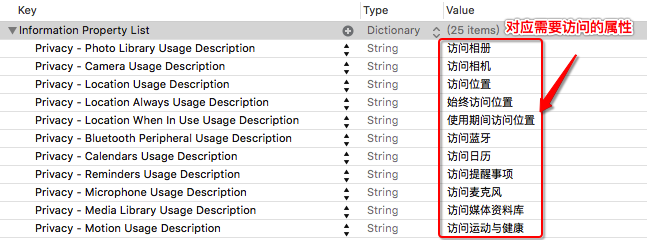
隐私访问权限
xcode8 iOS10中后不添加权限会出错
在info.plist文件添加对应的Key-Value:
聚焦(自动聚焦,手动聚焦)
坐标空间转换
如iPhone5屏幕坐标系左上角为(0,0)垂直时右下角为(320,568),水平时右下角(568,320)。
而设备坐标系基于摄像头的本地设置,左上角为(0,0)右下角为(1,1)。
AVCaptureVideoPreviewLayer定义了两个方法用于转换两者间的坐标:
- (CGPoint)captureDevicePointOfInterestForPoint:(CGPoint)pointInLayer NS_AVAILABLE_IOS(6_0);- 将屏幕坐标系转换为设备坐标系
- (CGPoint)pointForCaptureDevicePointOfInterest:(CGPoint)captureDevicePointOfInterest NS_AVAILABLE_IOS(6_0);- 将设备坐标系转换为屏幕坐标系
设置对焦模式
对焦模式
AVCaptureFlashMode有 三种 AVCaptureFlashModeOff 、AVCaptureFlashModeOn 和 AVCaptureFlashModeAuto
配置设备时一定要判断一下设备是否支持,比如前置摄像头不支持对焦操作
修改设备配置时需要先锁定配置lockForConfiguration执行所需的修改,最后解锁设备unlockForConfiguration
1 | - (void)setFlashMode:(AVCaptureFlashMode)flashMode { |
点击对焦
将屏幕坐标转换为捕捉设备坐标,然后将 focusPointOfInterest 设置为该坐标
1 |
|
调整曝光模式
与调整对焦模式类似,可以调整曝光模式
device.exposureMode
AVCaptureExposureModeLocked 锁定曝光 AVCaptureExposureModeAutoExpose 自动曝光 AVCaptureExposureModeContinuousAutoExposure 自动持续曝光 AVCaptureExposureModeCustom 自定义曝光 四个值
调整闪光灯模式
与之前的两个类似
1 | - (BOOL)cameraHasTorch { |
切换摄像头
切换摄像头时担心停止会话和重启会话带来的开销,但是对会话进行改变时,要通过
beginConfiguration和commitConfiguration进行单独的原子性的变化。
1 |
|
拍照,获取静态图片
AVCaptureStillImageOutput用于捕捉静态图片,执行- (void)captureStillImageAsynchronouslyFromConnection:(AVCaptureConnection *)connection completionHandler:(void (^)(CMSampleBufferRef imageDataSampleBuffer, NSError *error))handler;方法来获取图片
使用ALAssetsLibrary来将图片储存在照片中
1 | //拍照 |
视频捕捉
使用
AVCaptureMovieFileOutput来捕捉视频
在录制开始时,在文件的最前面会写入一个最小化的头信息,随着录制的进行,片段按照一定周期写入,创建完整的头信息,这样就确保了当程序遇到崩溃或者中断时,影片仍然会以最后一个写入的片段为重点进行保存。
1 |
|