Python爬虫教程-使用Scrapy

scrapy基础实例,爬取zhipin网站信息

scarpy的新建 + scarpy模拟登录 + 在pipeline中存取信息到sqlite3 +xpath解析页面

scrapy新建工程

1
scrapy startproject projectName

具体可以查看 python3爬虫学习

发现 parse 或者 start_requests是爬虫的入口

解析html

scrapy支持xpath 和 css 两种选择器。这里使用xpath。

比如 这个页面 我们要获取页面上帖子的链接:

1
2
3
4
5
6
7
8
9
10
...

def parse_page(self, response):
print("\n 开始 解析版面上的具体招聘帖子的链接\n")

selector = scrapy.Selector(response)
job_list = selector.xpath("//div[@class='job-list']/ul[1]/li/a")
for job_list_content in job_list:
url = self.host + job_list_content.xpath("@href").extract_first()
print("\n帖子 链接是: "+url+"\n")

这样就或获取到帖子的链接

递归

如何解析帖子链接的内容,并且递归到下一页呢?这里需要使用yield:

1
yield scrapy.Request(url=url, callback=self.parse_page)

scrapy会自行调度,并访问该url然后把内容拿回来

具体代码:

1
2
3
4
5
6
7
8
9
10
11
12
13
14
15
16
17
18
19
20
21
22
23
24
25
26
27
28
29
30
31
32
33
34
35
36
37
38
39
40
41
42
43
44
45
class TestZhiPinSpider2(scrapy.Spider):
name = "TestZhiPinSpider2"
host = "https://www.zhipin.com"

# 这个例子中只指定了一个页面作为爬取的起始url
# 当然从数据库或者文件或者什么其他地方读取起始url也是可以的
start_urls = [
"https://www.zhipin.com/job_detail/?query=iOS&scity=101210100"
]

# 爬虫的入口,可以在此进行一些初始化工作,比如从某个文件或者数据库读入起始url
def start_requests(self):
print(" 开始解析url ----------------------------------------------------------------------------------------")
for url in self.start_urls:
# 此处将起始url加入scrapy的待爬取队列,并指定解析函数
# scrapy会自行调度,并访问该url然后把内容拿回来
yield scrapy.Request(url=url, callback=self.parse_page)

# 版面解析函数,解析一个版面上的帖子的标题和地址
def parse_page(self, response):
print("解析 parse_page ----------------------------------------------------------------------------------------")

selector = scrapy.Selector(response)
job_list = selector.xpath("//div[@class='job-list']/ul[1]/li/a")
for job_list_content in job_list:
url = self.host + job_list_content.xpath("@href").extract_first()
print("帖子 链接是: "+url)
# 此处,将解析出的帖子地址加入待爬取队列,并指定解析函数
yield scrapy.Request(url=url, callback=self.parse_job_detail)

# 在此处解析翻页信息,从而实现爬取版区的多个页面
next_page_url = selector.xpath("//a[@ka='page-next']").xpath("@href").extract_first()
next_page_class = selector.xpath("//a[@ka='page-next']").xpath("@class").extract_first()
if next_page_class == "next":
next_page_full_url = self.host + next_page_url
yield scrapy.Request(url=next_page_full_url, callback=self.parse_page)
else:
print("没有下一页了----------------------------------------------------------------------------")

#具体的招聘信息
def parse_job_detail(self, response):
selector = scrapy.Selector(response)

job_url = response.request.url
print(" 解析 具体的招聘信息 --------url:"+job_url)

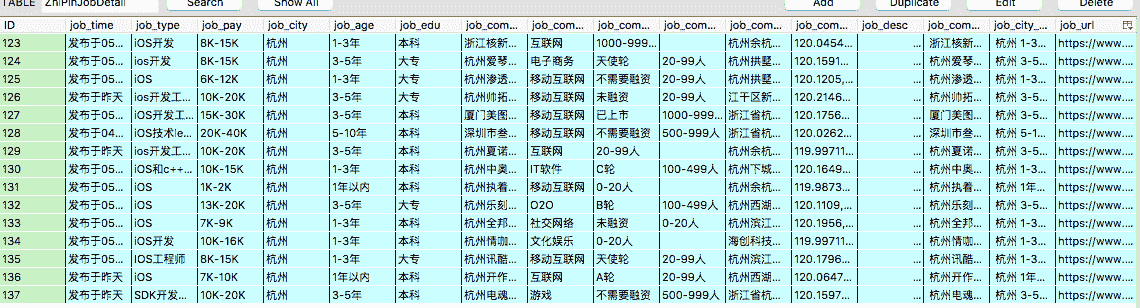
这个爬虫会将zhipin网站iOS招聘的信息都爬取一遍

Pipelines

可以看到新建工程后会生成一个pipelines.py的文件,可以在这里处理抓取的内容,存入数据库什么的。

1.在items.py中定义抓取的内容

这里简单写一个

1
2
class TestJobDetailItem(Item):
url = Field()

2.在pipelines中处理

在pipelines.py中新建Sqlite3Pipeline方法,原来可能有个FilePipeline不理它。

1
2
3
4
5
6
7
8
9
10
11
12
13
14
15
16
17
18
19
20
21
22
23
24
25
26
27
28
29
30
31
32
33
34
35
36
37
38
39
40
41
42
43
44
45
46
47
48
49
50
51
52
53
54
55
56
57
58
59
60
from jobSpider.items import JobDetailItem
from jobSpider.items import TestJobDetailItem
import sqlite3
import os
import shutil
from collections import OrderedDict

class Sqlite3Pipeline(object):

def __init__(self, sqlite_file, sqlite_base_file, sqlite_ZhiPin_table, sqlite_Test_ZhiPin_table):
self.sqlite_file = sqlite_file
self.sqlite_base_file = sqlite_base_file
self.sqlite_ZhiPin_table = sqlite_ZhiPin_table
self.sqlite_Test_ZhiPin_table = sqlite_Test_ZhiPin_table

@classmethod
def from_crawler(cls, crawler):
return cls(
sqlite_file = crawler.settings.get('SQLITE_FILE_PATH'), # 从 settings.py 提取
sqlite_base_file=crawler.settings.get('SQLITE_BASE_FILE_PATH'),
sqlite_ZhiPin_table = crawler.settings.get('SQLITE_ZHI_PIN_ITEM_TABLE'),
sqlite_Test_ZhiPin_table=crawler.settings.get('SQLITE_TEST_ZHI_PIN_ITEM_TABLE')
)

def open_spider(self, spider):
print("\n 连接数据库 \n")
self.create_sql_db()
self.conn = sqlite3.connect(self.sqlite_file)
self.cur = self.conn.cursor()

def close_spider(self, spider):
print("\n 关闭数据库 \n")
self.conn.close()

def process_item(self, item, spider):
print("\n Sqlite3Pipeline process_item\n")
if isinstance(item, TestJobDetailItem):
print(" sqlite3 处理 TestJobDetailItem ")

orderedDict = OrderedDict(sorted(item.items(), key=lambda t: t[0]))
keys = list(orderedDict.keys())
values = list(orderedDict.values())
insert_sql = "insert into {0}({1}) values ({2})".format(self.sqlite_ZhiPin_table,
', '.join(keys),
', '.join(['?'] * len(keys)))

self.cur.execute(insert_sql, values)
self.conn.commit()
return item
else:
print(" item 类型不对 sqlite3不处理")
return item

def create_sql_db(self):
#复制原始数据库,(也可以直接新建一个,只不过懒得写SQL……
sql_db_path = os.path.abspath(self.sqlite_file)
sql_base_db_path = os.path.abspath(self.sqlite_base_file)
print("\n create_sql_db \n ", sql_db_path, sql_base_db_path)
if not os.path.exists(sql_db_path):
shutil.copyfile(sql_base_db_path, sql_db_path)

这里例子详细写了将抓取数据写入数据库,这里用的是sqlite3。可以换成文件csv,mysql什么的。

3.在Setting中配置一下

找到settings.py 写入:

1
2
3
4
5
#数据库信息
SQLITE_FILE_PATH = '/Users/sts/Desktop/github/pythonWorkSapce/jobSpider/jobSpider/sqlite/Item_use.sqlite'
SQLITE_BASE_FILE_PATH = '/Users/sts/Desktop/github/pythonWorkSapce/jobSpider/jobSpider/sqlite/Item_base.sqlite'
SQLITE_ZHI_PIN_ITEM_TABLE = 'ZhiPinJobDetail'
SQLITE_TEST_ZHI_PIN_ITEM_TABLE = 'TestZhiPin'


1
2
3
4
# 配置pipeline
ITEM_PIPELINES = {
'jobSpider.pipelines.Sqlite3Pipeline': 400,
}

这里可以配置多个pipeline,后面的数字表示优先级。scrapy会根据优先级,把item依次交给各个pipeline来处理。

4.在爬虫中调用这个pipeline

在上面递归例子中,加入 yield item

1
2
3
4
5
6
7
8
9
10
11
12
13
from jobSpider.items import JobDetailItem

...

#具体的招聘信息
def parse_job_detail(self, response):
selector = scrapy.Selector(response)

job_url = response.request.url
print(" 解析 具体的招聘信息 --------url:"+job_url)
item = TestJobDetailItem()
item["url"] = job_url
yield item

scrapy会把这个item交给我们刚刚写的FilePipeline来处理.

登录

很多爬虫信息都要登录后才能抓取,这里也将登录模拟一遍,还是用 zhipin 网站。
使用zhipin网站的账号密码登陆模式

1
2
3
4
5
6
7
8
9
10
11
12
13
14
15
16
17
18
19
20
21
22
23
24
25
26
27
28
29
30
31
32
33
34
35
36
37
38
39
40
41
42
43
44
45
46
47
48
 # 测试登录
login_url = "https://www.zhipin.com/user/login.html?ka=header-login"
login_post_url = "https://www.zhipin.com/login/account.json"
host = "https://www.zhipin.com"
def start_requests(self):
yield scrapy.Request(url=self.login_url,
meta={'cookiejar': 1},
callback=self.request_captcha)

#获取验证码 这里简单使用手动输验证码
def request_captcha(self, response):
selector = scrapy.Selector(response)
captcha_url = selector.xpath("//img[@class='verifyimg']").xpath("./@src").extract_first()
randomKey = selector.xpath("//input[@class='randomkey']").xpath("./@value").extract_first()

full_captcha_url = self.host + captcha_url
fileName = self.captcha_file_path()
urlretrieve(full_captcha_url, fileName)

open_image_command = "open "+fileName
os.system(open_image_command)

captcha_str = input("请输入验证码:")
return scrapy.FormRequest.from_response(
response,
formdata={"regionCode": "+86",
"account": "手机号",
"password": "密码",
"captcha": captcha_str,
"randomKey": randomKey},
meta={'cookiejar': response.meta['cookiejar']},
callback=self.after_login
)

# self.open_host_page 就是开始爬的方法
def after_login(self, response):
print("after_login")
yield scrapy.Request(url=self.host,
meta={'cookiejar': response.meta['cookiejar']},
callback=self.open_host_page)

#验证码图片保存路径
def captcha_file_path(self):
captcha_file_name = "./image/captcha.jpg"
directory = os.path.dirname(captcha_file_name)
if not os.path.exists(directory):
os.makedirs(directory)
return captcha_file_name

setting的一些配置

1
2
3
4
5
6
7
8
9
10
11
12
13
14
# 间隔时间,单位秒。指明scrapy每两个请求之间的间隔。
DOWNLOAD_DELAY = 5
# 对一个网站的最大并发数
CONCURRENT_REQUESTS_PER_DOMAIN = 16
# 对一个IP的最大并发数
CONCURRENT_REQUESTS_PER_IP = 16
# 请求头
DEFAULT_REQUEST_HEADERS = {
'Accept': 'text/html,application/xhtml+xml,application/xml;q=0.9,image/webp,*/*;q=0.8',
'Accept-Language': 'zh-CN,zh;q=0.8,en;q=0.6',
'Accept-Encoding':'gzip, deflate, sdch, br',
'Connection': 'keep-alive',
'User-Agent':'Mozilla/5.0 (Macintosh; Intel Mac OS X 10_12_1) AppleWebKit/537.36 (KHTML, like Gecko) Chrome/57.0.2987.133 Safari/537.36'
}

最后

就可以爬取到所需要的招聘信息了:

具体代码查看: https://github.com/sunyanyan/jobSpider